Start Scratch
Scratch can be downloaded but for this excercise we'll be using the on-line editor at scratch.mit.edu. They're essentially the same but the on-line version allows the user to log on, search and access contributed projects, and share their own.
Once you've opened up the on-line editor, log in or create a user using the links in the upper right corner.
Now we're ready to create some drawings! We're going to start off drawing simple shapes, move on to gradually ones that take more work to draw and see how using repetition and defining variables can simplify these tasks and open up options that would have been way too tedious to do by hand.
A quick introduction to the tools
Feel free to skip this part if you're familiar with the Scratch interface and head straight to the first task.
Using the default setup, we start off writing instructions (programs) that control an orange cat on a white stage. We can change the look of the cat (or add other figures, called “sprites”) but let's just go with the default for the time being.
The instructions are given by piecing together blocks, each of which has some particular effect. To help us navigate the set of blocks they're categorised and colour-coded. The ones we'll be starting out by using are:
- Events
- The events blocks are used mainly to catch events (such as a mouse-click on the flag or the cat (or any other sprite), a keypress on the keyboard, or something along those lines. When an event happens (such as the “a” key being pressed) the ocrresponding event catching block (such as the “when a key pressed” block) is triggered and the chain of blocks below it is run.
- Pen
- The sprite's position can be changed using the motion blocks. This movement can be traced by setting a pen down. The pen blocks define the colour, shade and size of the path traced.
- Motion
- These blocks define the position, orientation and movement of the sprite.
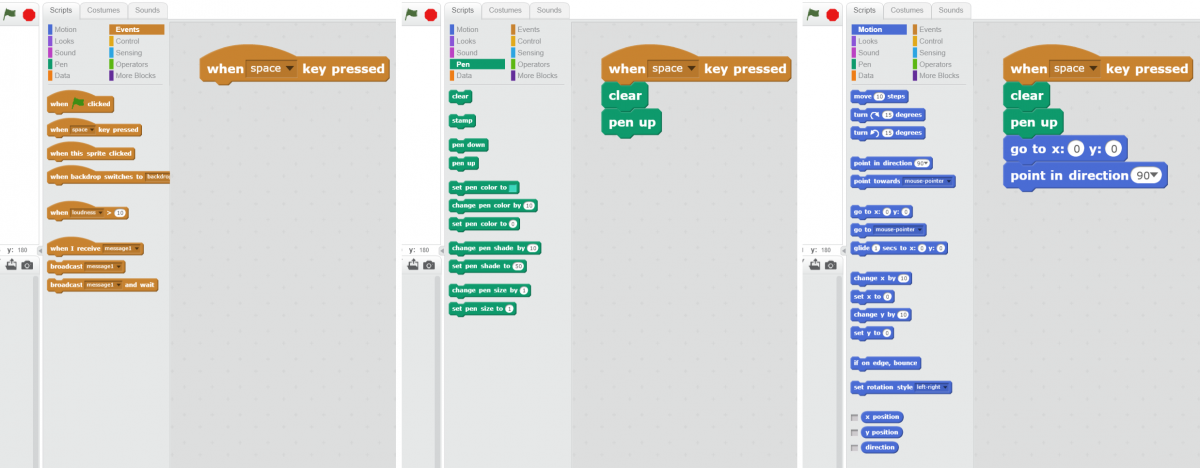
Below is an example of a program that, when the space-bar is pressed resets the stage by:
- clearing the stage,
- pulling the pen up,
- moving the sprite (the cat) to the middle of the stage, and
- turns to sprite so that it is facing to the right.
As we start drawing more complex shapes we'll introduce control structures and data variables.
Draw a square
This first drawing consists of a square with a side lenght of 100 pixels. For this we will have to:
- Pick an event to start the program
- Put the pen down
- Move the cat 100 steps
- Turn the cat 90°
- Move the cat 100 steps
- Turn the cat 90°
- Move the cat 100 steps
- Turn the cat 90°
- Move the cat 100 steps
- Turn the cat 90°
Once this is done we will have drawn a full square and returned the cat to the original orientation.
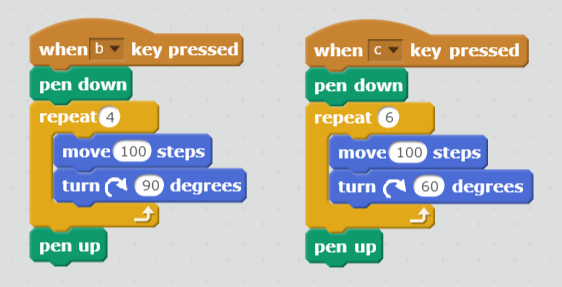
Draw a hexagon
For the second drawing, modify the previous program to draw a hexagon. You'll have to modify the angles and add two more sides. If you're feeling particularly adventurous you can also change the pen colour and side lengths.
Draw a tricontakaihexagon
Yes, that's right. A tricontakaihexagon is a 36-sided polygon. So now we're getting into some tedious work. We know how to set this up from our previous programs but, if you haven't started using the repeat control block, let's use those to simplify things a little.
Note that in the program you wrote to draw the square, a couple of blocks were repeated twice: move and turn. Now, rather than stack eight of those together, we could have just put two inside a repeat block and directed it to repeat its contents four times. Like so:
Now use such a repeat block to draw a 36-sided polygon.
Draw an n-sided polygon
For the n-sided polygon, let's explore three more types of blocks: operators, data, and sensing.
First, given the fact that computers are quite adept at calulating let's calculate the degrees to turn at each corner inside the program. For this we use the division operator to divide the full circle (360°) by the number of corners.
We can now have the program do a 17-sided polygon (a heptadecagon) without having to calculate the angle of each of those corners and plug it in. We do, however, have to change the number of sides in two places each time we want to change the polygon we're drawing.
To solve this, we go to the data section and define a variable by pushing the “make a variable” button. Type in a descriptive name (such as “number of sides” rather than just “num”). Pull a block to set the variable to the top of the program (above the repeat block that moves the sprite) and put in some value. Then pull the variable block (it has rounded sides) into where the number of sides are given.
This program is now fairly sophisticated, but let's add one more feature so that we don't have to go and change the program every time we want to change the number of sides. From the sensing section, pull an “ask” block to the top of the program and type into the question field something like “How many sides should the polygon have?”. Then pull the answer block (it has rounded sides like variables) and put it into the “set” block we just added to the program.
Next steps
We can now play around with the turtle program, tweak and expand its features, create images and challenge each other to copy their results, or whatever else we find interesting to do with the program.
The next project will focus on musicology.